Students frequently turn to Computer Class 11 GSEB Solutions and GSEB Computer Textbook Solutions Class 11 Chapter 11 Retrieving Data Using Queries for practice and self-assessment.
GSEB Computer Textbook Solutions Class 11 Chapter 11 Retrieving Data Using Queries
Question 1.
What are Queries in Base ? Why do we design Queries ?
Answer:
Query is the term identical with question, inquiry or analysis. A query is to ask question about the specific information from the database. Through query we can tell exactly which fields and records to view from the database.
Question 2.
Explain the use of Criterion in a query.
Answer:
Criteria in query is used to view selected records in a table. We can apply criteria also on multiple fields. We can use different signs for specifying criteria if we forget that it itself will take that.
Question 3.
What are wild card characters ? Explain in detail each of them.
Answer:
Using Wild Cards
- If the user wants to view the list of products with their model names starting with character set hp. Then create a new query using table Product.
- Select fields Pcode, ModelName, SellingPrice and OSSupport.
- Set the criterion as shown in following figure.
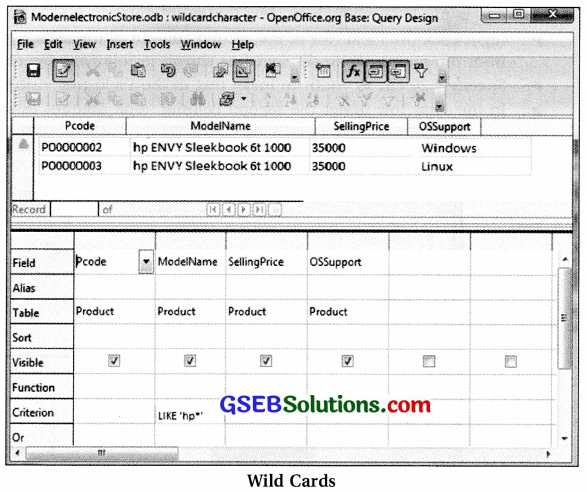
- The asterisk symbol (*) used in expression in Criterion cell of ModelName field in above figure is known as wild card character.
- A wild card is a symbol that represents any character or combination of characters.
- Thus ‘hp*’ represents a word whose first two alphabets are hp followed by any group of characters.
- Similarly, the criterion ‘Like *hp’ will display products with names ending with alphabets ‘hp’ and ‘Like
hp*hp’ will display products with names starting and ending with ‘hp’.
Note : The Like operator must be included with the wild card characters.
![]()
Question 4.
What are aggregate functions ? What are they used for ?
Answer:
Performing Calculations
Calculations within a query in Base can be performed using one of the following ways:
(1) Custom calculations
(2) Predefined calculations
(1) Custom Calculations:
- It includes performing numeric, date and text calculations on each record using data from one or more fields.
- Calculations include operations like add, multiply, subtract or divide the values in two different fields.
- To perform custom calculation we need to add an extra field known as calculated field.
- For example, in the OrderDetail table, the total amount pertaining to each product purchased by a customer can be calculated.
- The value of amount is equal to the Quantity multiplied by SalePrice.
- The new field that stores information about Amount is known as calculated field.
Perform the following steps to find out total amount paid by each customer in each month.
- Create a new query using Design View.
- Select the OrderDetail table from Add Table or Query dialog box.
- Double click on the OrderlD field to include it in design grid.
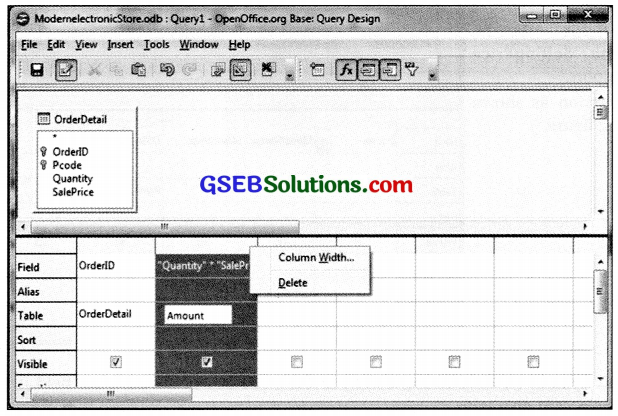
- Type Quantity * SalePrice in the Field row of the second column in the query design grid. The Field row is not large enough to view the entire entry in it.
- Right click the Field row in the second column in the design grid and then select Column Width from the popup menu displayed as shown in following figure would be displayed.
- Specify 4.20 cm as width to make text in the Field row visible.
- In the Alias row under the second column, type Amount as shown in following figure.

(2) Predefined calculations (Summarizing the data) :
- Many times calculations are required on group of records rather than on fields.
- For example, to find the total number of products, or computing average amount spent by each customer, there is a need to perform summary calculation.
- Base provides some predefined calculations to compute sum, average, count, minimum, maximum, standard deviation or variance on group of records.
- These calculations differ from calculated fields as they are applied on multiple records within a table resulting in a single value.
Do the following steps to design a query for finding total number of customers of Modern Electronic Store by performing the following steps :
- Click on Queries icon and select Create Query in Design View…
- Select the Customer table from Add Table or Query dialog box.
- Double click on the Ccode field.
- Type “Total Customers” in Alias row.
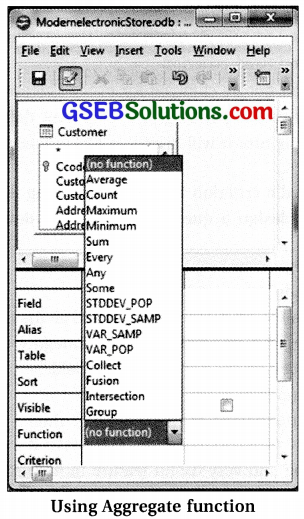
- In a row with label Function in query design grid, open the drop down menu.
- Select the Count function from the list of aggregate functions as shown in figure. ‘
- Run the Query and the total number of customers of Modern Electronic Store will be displayed.
Note : The results of a calculation in a field are only for display purpose.
These results are not stored in the underlying table.
Base performs the calculation each time a user runs the query.
Therefore, a result generated from such queries is based on the most current data available in the database.
![]()
Question 5.
Name and explain the most commonly used aggregate functions.
Answer:
Performing Calculations
Calculations within a query in Base can be performed using one of the following ways:
(1) Custom calculations
(2) Predefined calculations
(1) Custom Calculations:
- It includes performing numeric, date and text calculations on each record using data from one or more fields.
- Calculations include operations like add, multiply, subtract or divide the values in two different fields.
- To perform custom calculation we need to add an extra field known as calculated field.
- For example, in the OrderDetail table, the total amount pertaining to each product purchased by a customer can be calculated.
- The value of amount is equal to the Quantity multiplied by SalePrice.
- The new field that stores information about Amount is known as calculated field.
Perform the following steps to find out total amount paid by each customer in each month.
- Create a new query using Design View.
- Select the OrderDetail table from Add Table or Query dialog box.
- Double click on the OrderlD field to include it in design grid.
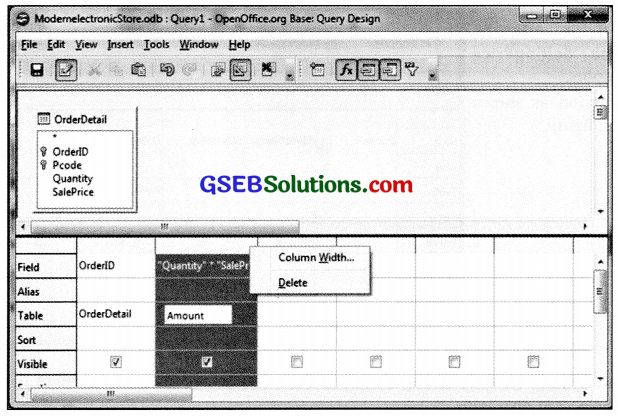
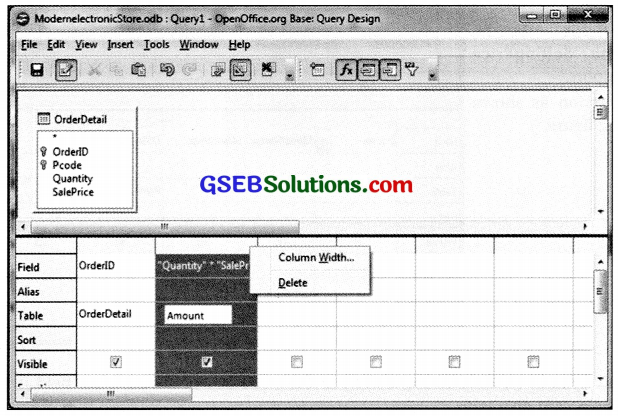
- Type Quantity * SalePrice in the Field row of the second column in the query design grid. The Field row is not large enough to view the entire entry in it.
- Right click the Field row in the second column in the design grid and then select Column Width from the popup menu displayed as shown in following figure would be displayed.
- Specify 4.20 cm as width to make text in the Field row visible.
- In the Alias row under the second column, type Amount as shown in following figure.
(2) Predefined calculations (Summarizing the data) :
- Many times calculations are required on group of records rather than on fields.
- For example, to find the total number of products, or computing average amount spent by each customer, there is a need to perform summary calculation.
- Base provides some predefined calculations to compute sum, average, count, minimum, maximum, standard deviation or variance on group of records.
- These calculations differ from calculated fields as they are applied on multiple records within a table resulting in a single value.
Do the following steps to design a query for finding total number of customers of Modern Electronic Store by performing the following steps :
- Click on Queries icon and select Create Query in Design View…
- Select the Customer table from Add Table or Query dialog box.
- Double click on the Ccode field.
- Type “Total Customers” in Alias row.
- In a row with label Function in query design grid, open the drop down menu.
- Select the Count function from the list of aggregate functions as shown in figure. ‘
- Run the Query and the total number of customers of Modern Electronic Store will be displayed.

Note : The results of a calculation in a field are only for display purpose.
These results are not stored in the underlying table.
Base performs the calculation each time a user runs the query.
Therefore, a result generated from such queries is based on the most current data available in the database.
![]()
Question 6.
Define Calculated Field. Explain it giving suitable example.
Answer:
Custom Calculations:
- It includes performing numeric, date and text calculations on each record using data from one or more fields.
- Calculations include operations like add, multiply, subtract or divide the values in two different fields.
- To perform custom calculation we need to add an extra field known as calculated field.
- For example, in the OrderDetail table, the total amount pertaining to each product purchased by a customer can be calculated.
- The value of amount is equal to the Quantity multiplied by SalePrice.
- The new field that stores information about Amount is known as calculated field.
Perform the following steps to find out total amount paid by each customer in each month.
- Create a new query using Design View.
- Select the OrderDetail table from Add Table or Query dialog box.
- Double click on the OrderlD field to include it in design grid.
- Type Quantity * SalePrice in the Field row of the second column in the query design grid. The Field row is not large enough to view the entire entry in it.
- Right click the Field row in the second column in the design grid and then select Column Width from the popup menu displayed as shown in following figure would be displayed.
- Specify 4.20 cm as width to make text in the Field row visible.
- In the Alias row under the second column, type Amount as shown in following figure.

Question 7.
Explain grouping giving a suitable example.
Answer:
Grouping the Data
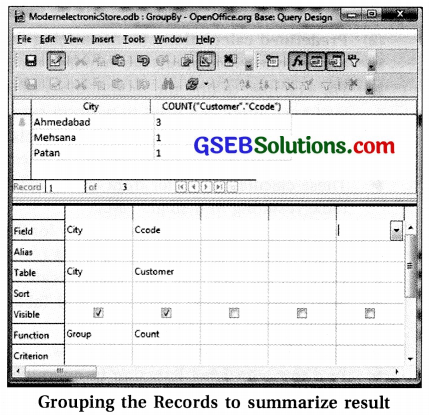
Do the following steps to make a group of customers in Ahmedabad, customers in Patan and similarly for all cities. Base makes this complex task very easy.
- Open a new query in Design View.
- Add the Customer table and the City table from Add Table or Query dialog box.
- Double click on the City field from the City table. Similarly select the Ccode field from the Customer table.
- In the Function row of the City field, select Group By as seen in following figure.
- In the Function row of Ccode field, select Count.
- Run the query and desired result will be displayed.
![]()
Question 8.
What are parameterized query ?
Answer:
A query with criteria that vary is called a parameter query. Here we have to enter parameter rather than actual value in the criteria cell. It displays a dialog box asking to enter the value to match the criteria for retrieving the data.
Question 9.
What does the value Empty mean ? Explain giving a suitable example.
Answer:
The field which is not having any value means it is null which is known as Empty value, e.g. if we do not know a friend’s birthdate, we might keep that cell empty during data entry which is called null value.
Question 10.
Choose the most appropriate option from ‘ those given below:
1) The result of a select query is generally represented as which of the following components ?
(A) Table
(B) Query
(C) Constraint
(D) Relation
Answer:
(A) Table
2) Which of the following feature of Base is used to retrieve specific information from the database ?
(A) Table
(B) Query
(C) Form
(D) Report
Answer:
(B) Query
3) Which of the following is not aggregate function ?
(A) Square root
(B) Sum
(C) Min
(D) Max
Answer:
(A) Square root
4) Which of the following is used to group the result of a query?
(A) Order by
(B) Group by
(C) Arrange by
(D) Set of
Answer:
(B) Group by
5) Which of the following Statement is true ?
(A) Query can be stored as an object in database and reused.
(B) Query is written to be used only once.
(C) Query cannot be created using wizard.
(D) Query cannot be written on a query.
Answer:
(A) Query can be stored as an object in database and reused.
![]()
6) What is an alias ?
(A) Alias is creation of duplicate query.
(B) Alias is used to give meaningful name to fields selected in a query.
(C) Alias is used to print query.
(D) Alias is nowhere related to query.
Answer:
(B) Alias is used to give meaningful name to fields selected in a query.
7) Which delimiter is used to surround the text in a query criterion ?
(A) “ (double quote)
(B) ‘ (single quote)
(C) $ (dollar)
(D) # (hash)
Answer:
(B) ‘ (single quote)
8) Which of the following operator is used with wild card character ?
(A) Like
(B) is
(C) Equal
(D) =
Answer:
(A) Like
9) Which of the following operator is used as wild card character in Base ?
(A) &
(B) +
(C) –
(D) *
Answer:
(D) *
10) Which query, when run, displays a dialog box asking to enter the value to match the criteria for retrieving the data ?
(A) Select Query
(B) Insert Query
(C) Parameter Query
(D) Update Query
Answer:
(C) Parameter Query
11) The Parameter name in parameter query is preceded by which symbol ?
(A) Comma
(B) Colon
(C) Question mark
(D) Explanation mark
Answer:
(B) Colon
12) SQL stands for
(A) Simple Query Language
(B) Structured Query Language
(C) Simple Question for Large databases
(D) Structured queries for large databses
Answer:
(B) Structured Query Language
![]()
Computer Class 11 GSEB Notes Chapter 11 Retrieving Data Using Queries
Defining Query
- Query means asking question, doing enquiry or performing analysis.
- In Base, to query is to ask a question about the information in the database.
- By raising a query, Base can display exactly which fields and records a person would like to view from the database.
- It is a set of rules for fetching information from a table or from several tables at once. Queries Window
- The result of a query is itself in the form of a table.
- It consists of a set of records, organized in rows (one per row) and columns (one per field).
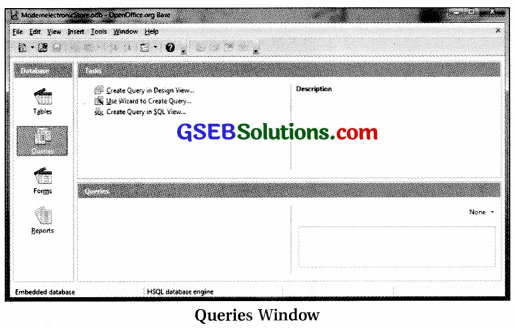
- To create a query, open a database and click on the icon labeled as queries in the left hand pane.
- The query window is organized like the other windows in Base.
- Different ways to create a query will be shown in the Tasks pane displayed at the top.
- The already created queries are listed under the pane titled queries.
- Previous figure shows the window when Queries icon is selected.
- Base offers three different ways to create a query, as it can be seen in above figure.
- Create Query in Design view….: This view provides a minimal amount of guidance.
- Use Wizard to Create Query….: Wizard guides the user through the process of querycreation.
- Create Query in SQL View….: It provides no guidance at all. Users need to have knowledge about the fourth generation computer language called Structured Query Language.
- Base’s Query Wizard has the advantage of helping the user to organize while requiring no previous knowledge.
Query Creation Using Wizard
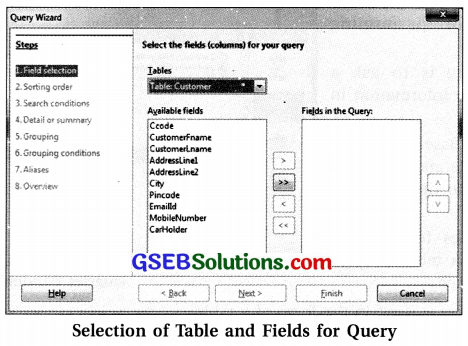
- Double click the option Use Wizard to Create Query…. A Query Wizard dialog box as shown in following figure will be displayed.
- Notice the left side of dialog box.
- Eight steps to create a query have been given.
- Only first step, field selection is compulsory.
- It helps in identifying the fields that are to be displayed in the output.
- Other steps allow formatting the output and can be skipped if not required.
- The first step in creating the query is to select the table and the set of fields in that table from which
information is to be retrieved. - We can select all or some of the fields visible in the Available fields list box.
- The left and right arrow buttons can be used to move the fields from the Available fields list box to
Field in the Query list box. - The selected fields will be a part of the query and will be listed under Field in the Query list box.
- These fields can be arranged in the order required using the up and down buttons.
- Once the fields have been finalized, the Next button has to be clicked.
- In following figure, table Customer has been selected and all the fields related to it can be seen under Available fields list box.
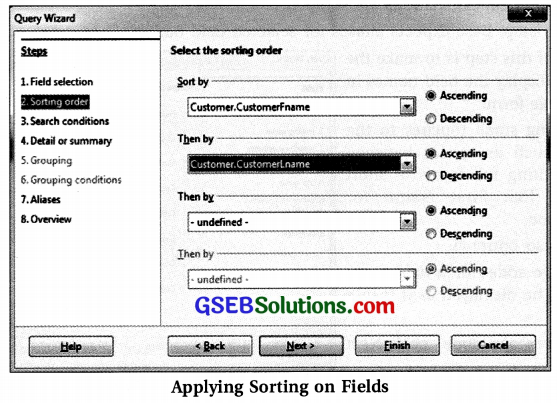
- The second step is to mention the sort order in which output of the query will be displayed. It allows the user to select up to four fields for deciding the sorting order of the output.
- For example, the user can display the query result sorted in order of the first name initially and then by the last name of the customer.
- After the Sorting order is done, click the Next button.
- After the Sorting order is done, click the Next button.
- Following figure shows how to select the sorting order of fields.
- The query is actually set up in the third step of the query.
- Appropriate values for the Field, the Condition, and the Value parameters have to be selected.
- Maximum three search conditions can be defined in one query.
- For example, if all customers with “Shah” as their last name have to be listed, then the criteria would be – Select the CustomerLname field from the drop down under the label Fields, then select is equal to from the drop down under the Condition label and finally in the text box under the label Value, type Shah.
- Observe there are two options Match all of the following and Match any of the following. As there is only one condition, there is no need to change the default setting.
- If there are multiple search conditions like a search is required for customers with last name as Shah or Patel then, there would be requirement to choose Match any of the following.
- Click the Next button after search conditions are finalized.
- Following figure shows the search condition settings for listing of all customers with last name as Shah.

- At this point Base skips three steps in its standard wizard and jumps to the seventh step.
- As the Customer table does not contain any numeric field, so steps including options to summarize or perform numerical calculations are skipped.
- In the seventh step, Base expects aliases for selected field names.

![]()
- The purpose of this step is to make the query wizard display the field names in human readable form.
- It allows adding small touches to the field names such as spaces between words and writing full forms of short field names like First Name for CustomerFname.
- This step is also optional.
- If no aliases are added then field name of a table will be displayed as it is in a query.
- Once all aliases are done, click Next button.
- Following figure shows how to add aliases. Adding Aliases
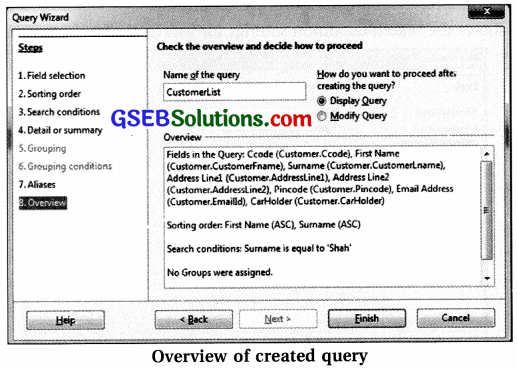
- In the final or the eighth step, an overview of all steps is displayed.
- Following figure gives us the overview of query recently created.
- One can assign desired name to the query by typing it in the text box labeled Name of the query.
- In the example the user has named it CustomerList.
- Here a moment should be spared to look over the work done.
- In case some changes are required, use the Back button to make the desired changes.
- Once the query is created, the only way to make changes is through Design View.
- There are two options under the question How do you want to proceed after creating a query.
- At this point the user can either view the query result immediately by selecting Display Query option, or else open it in Design View using Modify Query option.
- Design View can be used to insert additional features in query that may be beyond the capacity of the wizard.
- In the above example, where user expects list of customer names and addresses, the user also expects city name, state name and country name as well.
- The customer table selected consists of only Pincode field.
- Details related to the Pincode field are available in other tables namely City, State, and country.
- However Wizard used to create a query provided the option of selecting a single table.
- Thus Design Views are used to create complicated queries.
- Click on Finish and the query result of the query will be displayed in Data Sheet view as shown in following figure.

- Another query can be created now to calculate the amount received so far for each other.
- Use the query wizard once again to explore working with numeric fields.
- Make sure that the Queries icon is selected.
- Double click on Use Wizard to Create Query option.
- In step 1 of query wizard select OrderPayment table.
- Notice that in the drop down list, the CustomerList query created recently is also included along with all the other tables.
- Base allows the user to make use of a query already created for creating another query.
- Select OrderlD and PaymentAmount fields and click on the button with greater than symbol (>) to move these fields to Fields in the Query: list box.
- Click on Next button.
- In step 2 select the OrderlD field from the drop down box labeled as Sort by.
- Click on Next button.
- Here there is no requirement to filter records, as no such criterion is mentioned.
- Skip the step 3 by clicking on Next button.
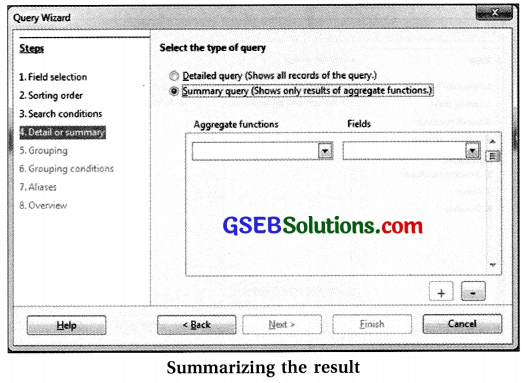
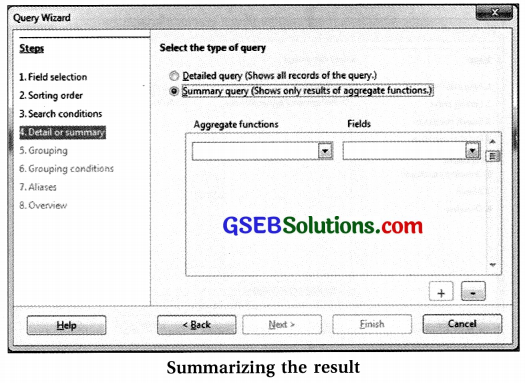
- A dialog box of step 4 will be seen as shown in following figure.
-
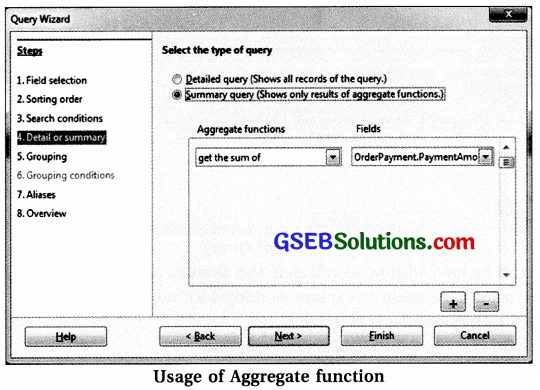
- Select the Summary query (Show only results of aggregate functions) options as shown in previous figure.
- Click on the drop down box shown under Aggregate functions label. Select get the sum of option.
- Similarly select the OrderPaymentAmount field from the Fields drop down box to sum the PaymentAmount field.
- This operation is shown in following figure.
-
- Click on Next button, leading you to step 5.
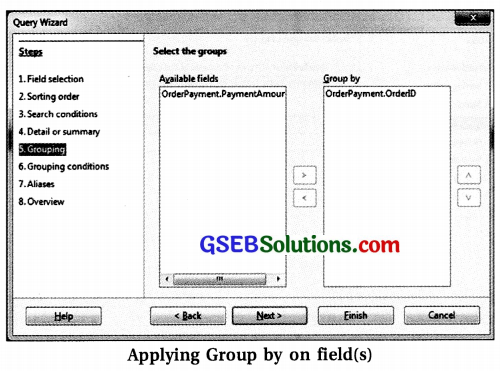
- Here specify the fields for which groups have to be created.
- The user may choose to perform the sum of payment amounts of all records. But that will give the user total amount received from all the customers so far by Modern Electronic Store.
- Therefore, if manually this operation is to be performed, records will have to be grouped as per the OrderlD field first.
- This means the user needs to arrange the records having OrderlD value as T in one group, all records having OrderlD value as’2′ in another group and so on.
- Then for each group, the payment amount will be added.
- As a result, one record pertaining to each OrderlD will appear in the query result.
- Therefore, in this step, as shown in following figure, the OrderlD field is to be mentioned in Group by list box.
-
- Click on the Next button.
- In step 6, we can specify some grouping conditions to further filter the output if required.
- No additional filters are required here, so click on Next button.
- In step 7 mention Aliases if needed and click the Next button.
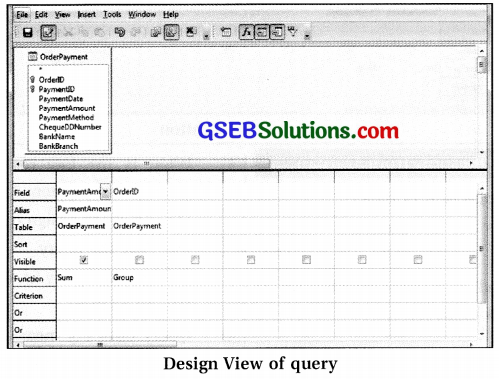
- In step 8 assign it a name Query_OrderPayment and select the Modify Query option. This option is recommended here because, if directly the query is executed, Base will show only one field, PaymentAmount corresponding to each order. However, the OrderlD will be seen along with Payment Amount field.
- Click on Finish button.
- The query opens in a Design View as shown in following figure.
-
- Select the check box available under OrderlD field as shown in following figure.

-
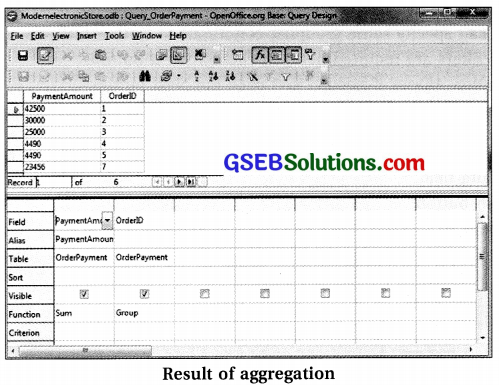
- Click on Run Query button
 to execute the query.
 - The result similar to the figure will be displayed.
- Click on Run Query button
![]()
Creation of Query Using Design View :
- While creating a query to list the customer addresses, it is not possible to get the details from the City, State and Country table.
- This is because the wizard allows creating a query on a single table only.
- The same query can be re-created using the Design View.
- Click on the Queries icon in the Database Window.
- Double click on the Create Query in Design View option in Tasks pane.
- Add Table or Query dialog box can be seen as shown in following figure.

-
- Select the Customer table and click on Add button.
- Select City, State and Country table.
- All the four tables in the Table pane will be seen as shown in figure.
- Base also displays the relationship, which were earlier defined between the tables.
- Click on the Close button.
- If more tables are to be added, Select Add Table or Query dialog box again by clicking on Add Table or Query
 button on the Query design toolbar.
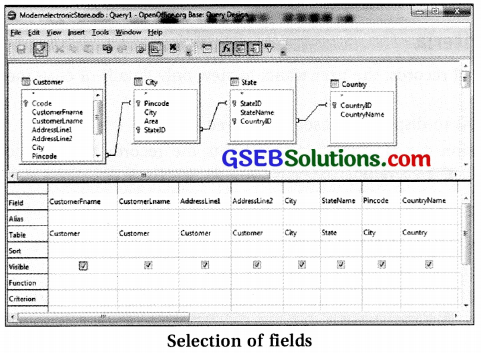
 - Double click on CusomerFname, CustomerLname, AddressLinel, AddressLine2 fields from the Customer Table.
- Similarly select City field from City table, StateName field from State table, Pincode field from City table and CountryName field from Country table.
- The field names along with their respective table names will be displayed in grid as shown in following figure.
-
- Observe some record (row) headings like Alias, Sort, Visible, Function, Criterion and Or.
- Also note that by default visible option for each field is set to true. It indicates that all selected fields will be displayed in the output.
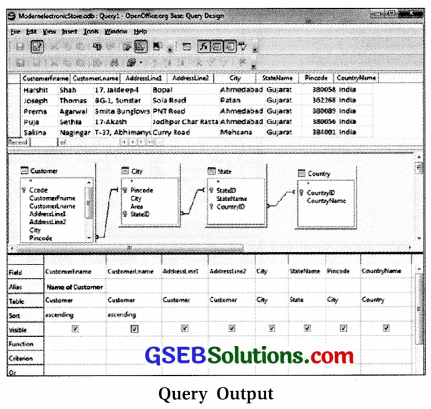
- Alias can be used for displaying meaningful names for the fields. For example, in place of CustomerFname, Name of Customer as column title can be used for the query result.
- Type Name of Customer in the text box visible after the row heading Alias under the CustomerFname column.
- To display customer records in alphabetical order of his/her names, select ascending from drop down box visible after the row heading Sort under the CustomerFname column.
Similarly, select ascending in the Sort option under the CustomerLname column. - Click the Run Query button on the Query Design toolbar. Query result similar to the one shown in figure would be displayed.
- To save a query for later use, select the Save option from the file menu. Alternatively click on the Close button and Base will display a Save dialog box.
- Type desired name, for example Customer Addresses and click on OK button.
- Close the query window once you have observed the output.
Editing a Query :
- After creating a query, one may like to change a query. For example, in a query created above, the user might want to add Surname as an alias in CustomerLname column.
- To make this change follow the following steps:
- Click on Queries icon. Right click on the query Customer Address from the popup menu, choose
Edit option. - This will display the query in Design View.
- Type Surname in the text box visible after row heading Alias under the CustomerLName column.
- Run Query.
- Click on Queries icon. Right click on the query Customer Address from the popup menu, choose

Applying Criteria
- Instead of viewing all records, the user wants to view only details of customers residing in the city of Ahmedabad.
- This means Base has to display a subset of selected records.
- To do this, a criterion can be specified that limits the records to only those where the City field contains “Ahmedabad” as a value.
Using Single Field
- Right click on the CustomerAddress Query.
- Click Edit option to open the query in Design View.
- In the Criterion cell of the City field type “Ahmedabad” as shown in figure.
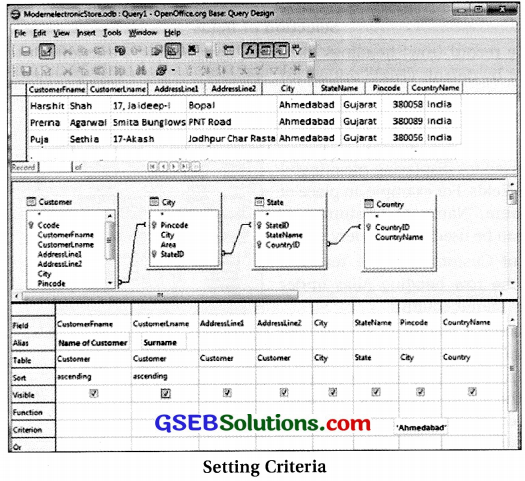
- Note that the text must be enclosed within a quotation (? ‘) delimiter; date must be enclosed in the hash(#) delimiter while the number literals do not need any delimiters.
- If the user forgets to put any delimiters, Base does not show any error, instead will apply the delimiters on its own.
- Apart from the constant values used as shown in previous figure. Base also allows to design expression for defining criteria using different types of operators.
- The operator list is as shown in following table.
| Operator | Symbols |
| Comparison | =, >, <. >=, <=, <> |
| Logical | And, Or, Not |
| Special | like Is, Between, In |
Operators used in Base
- If the user wants to display the list of employees who joined after 1st June 2011.
- Then a new query can be created in Design View.
- Add the Employee Table. Then select fields FirstNAme, LastName and JoiningDate.
- Type “>#01/06/2011# in the Joining Date Column.
- Now Save and Run the Query.
- The output will be similar to the one shown in following figure.
- Observe that the JoiningDate field is not displayed.
Note : When any field is not to be displayed in the query output, clear the check mark shown in the Visible property of that field.

- Similarly to display employees who joined between 1st June 2005 and 1st Nov 2012, the Cirtertion in the JoiningDate field can be set as “>=#1/6/2005# And <=#11/1/2012#”.
- Base also offers Between operator to specify the same criteria as shown in figure.

- If the user wants to send discount coupons to customers who live in the city of Ahmedabad and Patan, then a list of customers residing either in the city of Ahmedabad or Patan will be required.
- Create a new query in Design View.
- Add the Customer, City and State tables.
- Then select CustomerFname, CustomerLname, AddressLinel, AddressLine2, City, StateName and CardHolder fields from the tables as shown in following figure.
- Type the criterion as can be seen in the City field.
- The output will be similar to the one shown in following figure.
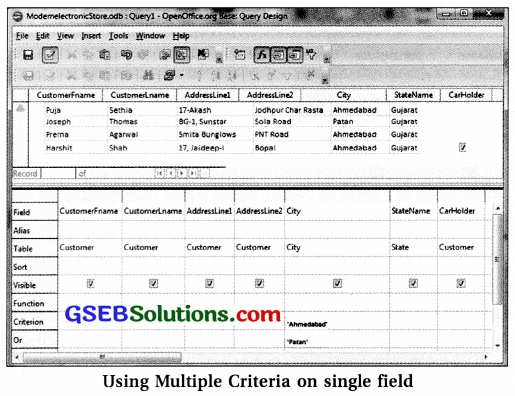
- Criteria for the above query can also be specified using IN operator (‘Ahmedabad’; ‘Patan’) in the Criterion row of the City field and the output will be the same.
- To retrieve records of customers from all the other places except Ahmedabad or Patan, NOT IN (‘Ahmedabad’; ‘Patan’) can be used in the Criterion row of the City field.
![]()
Using Multiple Fields
- If the user wants to send discount coupons only to card holders of Modern electronic Store residing in Ahmedabad or Patan, the AND operator can be used which specifies that City should be either Ahmedabad or Patan and CardHolder field should not be empty.
- OR criteria is needed to be applied here within field and AND criteria between fields.
- Type the criteria as shown in figure.
- Here the NULL (no check mark in CardHolder field) signifies that field is empty.
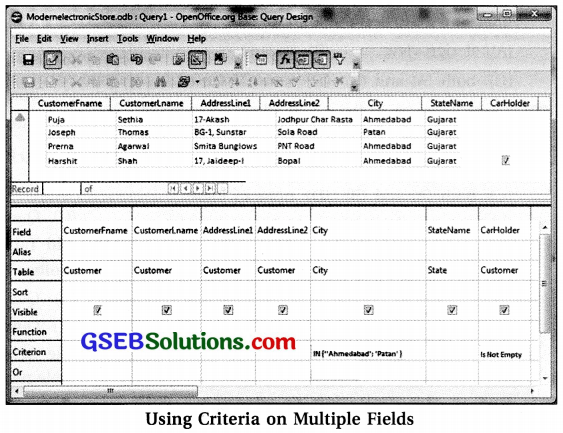
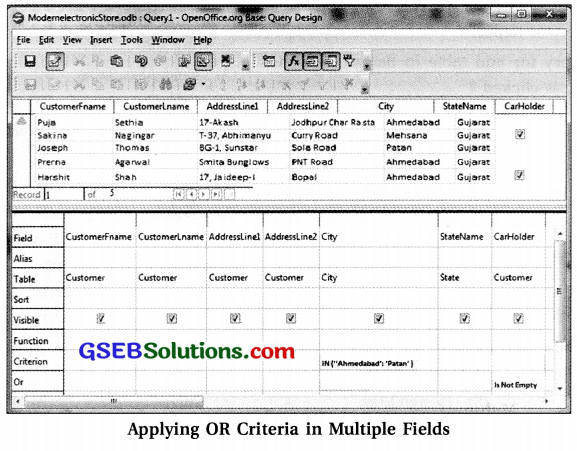
- If the user now wants to view the list of customers who can belong to either Ahmedabad or Patan or has Membership Card, then type IN (‘Ahmedabad’, ‘Patan’) in the Criterion row of the City column.
- Then type Is Not Empty in the Or row of the CardHolder column as shown in following figure.
- Note : The difference between the previous query and this query.
- In the previous case, both the expressions were written in the same row while applying the AND condition between two fields. While in this query, the OR condition between two fields is written in separate rows.
- Observe the result set as shown in figure, a new record of a customer from Mehsana is also listed as the customer is also a membership card holder.
Parameter Query
- Parameter queries are designed to accept values from the user at run time.
- The queries created so far used fixed criterion.
- The criterion once defined will not be changed for every execution of the query.
- The output of the query may vary depending on the current data in the table.
- Whenever a parameter query is run, it will display a dialog box asking the use to enter the values of the parameter.
- These values are then assigned a criterion values for retrieving the data.
Following steps are used to design a query to display the detail of laptops available at Modern Electronic Store.- Open new query in Design View
- Add the product and ProductCategory table.
- Double click on * visible in the Product table. It will add all the fields of the Product table in the query.
- Double click on the CategoryName field from the Category table.
- Type Laptop in Criteria cell of the CategoryName field.
- Save the query with name DetailsOfLaptops.
- If the user needs to retrieve the details of smart phones, then a new query has to be designed with Smart Phone as criteria in the CategoryName field and save it as DetailsofSmartphones.
- Base has one more interesting and very useful feature to help in this type of situations.
- Create a Parameter Query.
- There will be a need to enter the Parameter, rather than specifying the actual value in the Criterion cell.
- When the query is run then Base displays a dialog box that will prompt the user to enter the value of the parameter specified.
- Following are the steps to create a parameter query for listing out the different product categories.
- Open a new query in Design View.
- Add the Product and ProductCategory tables.
- Double click on Pcode from the Product table.
- Double click on the CategoryName field from the Category table.
- Type : CategoryName in the Criterion cell of the CategoryName. The query will look as shown in following figure. (Parametrized Query)
- Note that the criterion parameter must be preceded by a colon symbol (:).
- Click on the Run button to view query results.
- Base will display dialog box as shown in following figure. (Parameter value)
- Type Laptop in the text box under label Value and click on OK button. List of laptops will be displayed.

![]()
Structured Query Language
- Note that there is always more than one way to do the same task in Base.
- For example, Create Table in Design View and Use Wizard to Create Table. Both options allow the user to create table of a database.
- The difference is that the wizard makes the task easier while Design View gives more flexibility.
- Base gives a third option too, for creating table; the SQL commands, which gives the most flexibility
and control. - SQL stands for Structured Query Language.
- It is a standard language used to query a relational database.
- The SQL queries are in the form of statements.
- Earlier, we had created table, inserted data into it, edited and deleted the data in the tables.
- All this can also be done using SQL statements.
- Click on the Tools options in the menu bar and select the SQL…. Option.
- The Execute SQL Statement dialog box will get opened with a cursor blinking in the text box under the label Command to Execute.
- Here, instructions can be typed to perform different operations related to table or a query.
- Create a table named Scheme that has four fields SchemelD, StartDate, EndDate and Description.
- Attention has to be paid to quote signs, capitalization and syntax to avoid errors in execution of queries.
- Type the statement shown below in the text box under the label Command to Execute as shown in following figure.
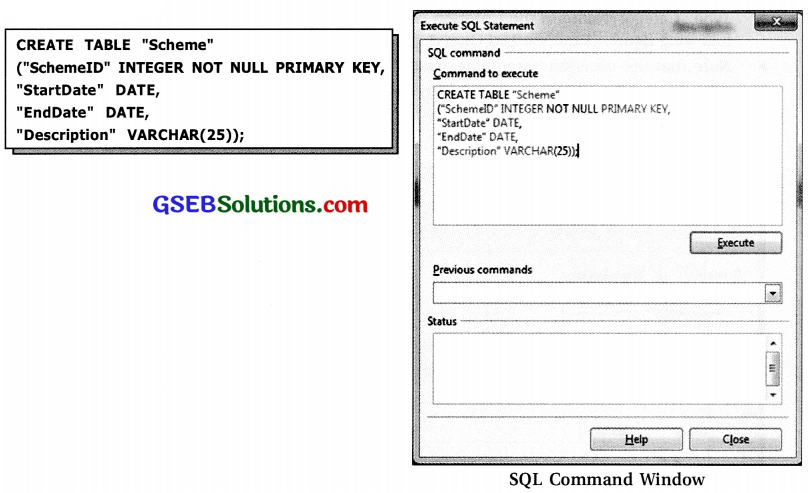
- When the instructions are entered, the Execute button gets highlighted.
- Click on the button after the instructions have been written.
- This will run the SQL command and the table would be created.
- After a few seconds, the window will inform that the instructions have been executed.
- Other than that there will be no visible output on the screen.
- Click on Refresh Tables from the View menu.
- A complete list of tables created will appear in the lower section of the screen which will include the new table recently created.
- When there is a need to remove the table from a database, The DROP TABLE statement is used to remove a table.
- For example, if the Scheme table (recently created) has to be dropped, then in the text box under the label Command to Execute write the following statement.
DROP TABLE Scheme IF EXISTS; - Click on the Execute button to see that the Scheme table is removed from the database.
- SQL Commands can be used to retrieve information from the table. Different window is used to do this.
- To open this Window click on Queries icon.
- Three options will appear in the top panel under the label Tasks.
- Select the Create Query in SQL view Option.
- This opens a dialog box with a blinking cursor as shown in figure.
- Type the required SQL statement to retrieve any information.
- The SQL statements to retrieve information start with SELECT keyword and are also known as SQL queries.
- Following figure shows an example of SQL query.

Following are the steps to get the output of the query SELECT * from Employee visible in above figure.
-
- Click on Run Query button on the function bar at the top to view the result.
- All the complete details of all the employees stored in the Employee table is displayed.
- To save the query, click on Save button.
- Name the query as EmployeeDetails and close the Window.
- To create some more SQL queries, open new query in Design View.
- Select the Create Query in SQL view option.
- Type the following statement:
SELECT FirstNAme, LastNAme from Employee; - Click on Run Query button on the function bar at the top to view the result.
- Note that the result now displays data for only two fields namely FirstName and LastName for all the employees.
- Note that the query created using SQL statement is also available under the Queries tab similar to queries created using Design View.
- Right Click on any query, select the Edit in SQL View option.
- For example, right click on the query CustomerList select Edit in SQL View and the query statement as shown in following figure will be seen.
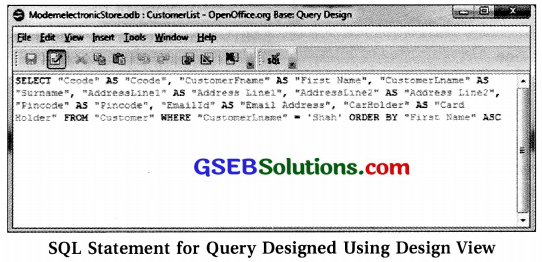
- The words Ccode, First Name, Surname, Address Line1, Address Line2, Pincode, Email Address and CardHolder visible after the keyword AS are aliases.
- While the word Customer after keyword customer is a table name.
- SQL statement in above figure also includes keyword WHERE that is used to retrieve the records based on criteria.
- The keyword ORDER BY is used to indicate that output needs to be sorted on field CustomerFname (represented by an alias First Name).
- The keyword ASC further mentions that data should be sorted in ascending order of first names.