Students frequently turn to Computer Class 12 GSEB Solutions and GSEB Computer Textbook Solutions Class 12 Chapter 2 Cascading Style Sheets and JavaScript for practice and self-assessment.
GSEB Computer Textbook Solutions Class 12 Chapter 2 Cascading Style Sheets and JavaScript
Question 1.
State the purpose of Cascading Sty1eshets.
Answer:
- Cascading Stylesheets or CSS allows you to specify styles for the visual elements of the website.
- It helps us to keep the information content of a document separate from the details of how to display it.
- The detail of how to display the document is known as style.
- Styles specify the appearance of particular page elements on the screen.
- Keeping the style separate from the content helps us to :
- Avoid duplication in coding
- Use the same content with different styles for different purposes
- Easy maintenance of code
- In HTML, for example, if we want contents of some paragraph tag <p> to appear in bold, then we have to insert the bold tag <b> every time the <p> tag appears in the source code.
- If the website is large, repeating the tag every time becomes tedious and time-consuming.
- But using CSS, we can set all element types to appear in a style as per our choice.
- So even if we have more number of <p> tags in the website, using CSS we can set the style for all the <p> tags at once.
- Thus we can say that, HTML is used to describe the information content of the document and not the style, while CSS describes the style of the elements in the document and not its contents.
- Using CSS, we can control the font types of font and element colors,-pad spaces, margins and element positions in our website.
![]()
Question 2.
Why should we keep the style and the content of a webpage separate?
Answer:
- Cascading Stylesheets or CSS allows you to specify styles for the visual elements of the website.
- It helps us to keep the information content of a document separate from the details of how to display it.
- The detail of how to display the document is known as style.
- Styles specify the appearance of particular page elements on the screen.
- Keeping the style separate from the content helps us to :
- Avoid duplication in coding
- Use the same content with different styles for different purposes
- Easy maintenance of code
- In HTML, for example, if we want contents of some paragraph tag <p> to appear in bold, then we have to insert the bold tag <b> every time the <p> tag appears in the source code.
- If the website is large, repeating the tag every time becomes tedious and time-consuming.
- But using CSS, we can set all element types to appear in a style as per our choice.
- So even if we have more number of <p> tags in the website, using CSS we can set the style for all the <p> tags at once.
- Thus we can say that, HTML is used to describe the information content of the document and not the style, while CSS describes the style of the elements in the document and not its contents.
- Using CSS, we can control the font types of font and element colors,-pad spaces, margins and element positions in our website.
Question 3.
Explain the syntax of CSS.
Answer:
- The syntax of CSS consists of special symbols known as rules. A CSS rule has two main parts :
- A selector and one or more declarations.
- The selector is the HTML element on which you want to apply the style.
- Declaration consists of a property associated with the HTML element used in selector and its corresponding value.
- The general syntax of CSS is defined as : selector {property : value}
- Figure gives an example of one such syntax :

- We can easily add CSS using KompoZer.
- Let us learn how to add CSS to a webpage in KompoZer.
- To make sure that KompoZer uses CSS by default, click Edit → Preferences.
- This will open Options dialog box as shown in figure.

- Select the General category on the left side of the window.
- Select the checkbox “Use CSS styles instead of HTML elements and attributes” if it is not selected.
- KompoZer will now use the CSS styling instead of HTML to format the text.
Example – 1 :
- Assume that we want to design a website and the heading on all the webpages should follow a particular style.
- For example, all the Headings (hi) inserted in the webpages should follow the style as given :
- Font : Times New Roman
- Case : Uppercase
- Alignment : Centre aligned
- Background color : Light Blue
- Border : Dotted Border
- Follow the steps given to create the CSS for the above heading.
- Open a new file.
- Give the Title name and save the file.
- In the composition toolbar, select the Cascade button

- Note : If the file is not saved, the Page title dialog box will be opened. After giving the page title, save the file.
- This will open the dialog box as shown in figure.

- Using this dialog box we will define the styles for each element.
- Click on the first radio button “style applied to all ‘the elements of type”.
- From the drop down menu choose an element to create the style rule.
- As we want to create a style for Headingl, we have selected hi (Heading 1) from the drop down menu as shown in figure.

- Click the Create Style rule button. You will see that the CSS Stylesheets dialog box remains open but the options will change.
- Figure shows the hi element just below the heading “internal Stylesheet” on the left pane of the window.
- For each element we add, a style rule will appear in this list below the heading “internal Stylesheet”.
- On the right side of the window, you will see various tabs like General, Text, Background, Borders, Box, Lists and Aural. Each of these tabs can be used to give a specific style to the element.
- But all the tabs may not be applicable to the selector for which the style rule is created.
- Now, let us create the style rule for hi selector. Select hi in the left pane of the window. Click the ’Text’ tab as shown in figure.

- This will show various style options like Font family, Font size, Line height, Color, Case, Alignment and many more.
- We will now select the options as per the style required for hl.
- In the Font family section, select the “predefined” radio button and choose “Times New Roman” from the drop down menu.
- Choose “Uppercase” from the Case menu and “Center” from the Alignment menu.
- Figure shows the options selected. As you change the options, you can see the default text in the window changes automatically according to the styles.
- To set the background color, select the Background tab. This will open the options for the background as shown in figure.
![]()

- In the Color option, click the color palette button. This opens Block Background Color dialog box as shown in figure.
- Select the color of your choice and press OK button.

- Figure shows the background tab after selecting the color.

- Note : If you want to keep an image in the background then in the Image option; click on “Choose file” and select the file for the background.
- To set the border, select the Border tab. This will open the options for the border as shown in figure.

- If you want to apply the same border on all the four sides, tick the checkbox in front of the text “All four sides use same border style”.
- You will see that only one option “Top” will be enabled and all others are disabled. This is because; the effect made on a single side will be applied on all the four sides.
- From the drop down menu of Style, select dotted.
- You can also specify the width and the color of the border as per your choice.
- We can also see the preview of the border style used by us. Press OK button.
- There are more options available if you select the other tabs in the window.
- But in our example, we require only the selected Options for applying style to hi.
- Click on the General tab.
- This will show the CSS code which is generated as shown in figure.
- If you know HTML coding you can also edit the code.

- Thus, we have created the style to be applied to hl tag.
- We can use the same procedure to create a style for any other element in the webpage. To add other elements, click on the arrow of CSS button
 in the upper left corner of the CSS Stylesheets dialog box. Choose “style rule” from the drop down menu.
 - After adding the style rule for all the elements click OK button.
Example – 2 :
- Let us now use the CSS created for hi tag in a webpage.
- In Format toolbarl, select the Headingl option to insert a heading in the page.
- When you select the Headingl option, your cursor will automatically be placed in the center of the webpage (as we had applied center alignment in CSS).
- Type some text like SARASWATI VIDYAMANDAL and to this heading gives the CSS effect and shows the CSS coding.
- Select Headingl from the Formatting Toolbarl. Cursor will automatically placed in the centre as we have selected Center alignment for CSS.
- Now type SARASWATI VIDYAMANDAL. The typed content will appear in uppercase with font style “Times New Roman”.

- This is a webpage that uses Headingl text with CSS applied to it.
- So, now wherever you insert Headingl in any of the webpages, the style will remain the same for all.
Select the source tab at the bottom of the window to view the CSS stylesheet code. The figure shows the CSS code in the head section of the page source code.

Question 4.
State the advantages of CSS.
Answer:
- From the above discussion we can say that CSS allows us to set the format of the website without changing the underlying structure.
- By separating the layout and format properties of the website from its underlying logical structure, we can make changes to the website without the fear of accidentally changing the data.
- The web designer’s job is made easier as to change the style of an element he only needs to make modifications in the CSS file.
- Since we have to set the style for each element only once, the CSS has less-code compared to that in HTML.
- Thus the webpages will load faster.
- Using CSS makes website designing quick and efficient.
![]()
Question 5.
List the disadvantages of CSS.
Answer:
- The CSS compatibility varies with different browsers.
- This means that some of the Stylesheet features are not supported by the browser and the style cannot be displayed as per the users design.
- But now-a-days, the latest browser versions are more standard-compliant and the compatibility issue has reduced.
Question 6.
Why do we use JavaScript in HTML. pages?
Answer:
- HTML was originally used to control the appearance of webpages.
- The webpages designed using HTML, were static and could not be changed after the browser rendered them.
- However, with the growth of Internet, people demanded the websites to have greater interactivity and better visual design.
- But, HTML could only provide static webpages. Thus, the demand of more interactivity created the need for a new web programming language.
- Hence, Netscape developed JavaScript. JavaScript is a scripting language that allows you to add programming aspects to your webpages.
- A scripting language is a simple, lightweight programming language that does not contain the advanced programming functionalities of languages like C and Java.
- JavaScript is used in webpages to improve the design and validate the forms. It adds interactivity to HTML pages and is inserted directly into the HTML code.
- Today, mostly all the web browsers like Mozilla Firefox, Chrome, Safari and Internet Explorer support JavaScript.
- Using JavaScript a webpage no longer remains static, but can include coding that allows interactivity with the user, control the browser and dynamically create HTML content.
- We learnt how to create forms using KompoZer.
- When the user enters data in the form, he might leave some of the-important fields empty or may enter the data in a wrong format inside the field.
- In such cases there must be some type of validation provided. This validation will restrict users from making mistakes.
- As HTML language creates static webpage, there is no change in the activates done by the user like movement of the mouse, input process or submit the form etc. There is no change in the static webpage while as JavaScript is dynamic. Necessary changes can be done in the original page.
- There is no change in the static page while loading or during the display. For e.g. If we want to display today’s date on the webpage, it is not possible.
- Previously www was used only for the give and take of data but today it is used for entertainment, knowledge, business etc. That is why webpage should impressive and more interactive while static webpage is not very interactive .
- We can input data in the form created in HTML but can not process this data for processing data, programming language is required. Computer program make the page more interactive. If some elements are lacking in HTML, they are programming elements. By using JavaScript with HTML, its capacity can be increased which help us to create a dynamic webpage.
Remember this :
- When the user enters wrong data or leaves a field empty, an error message should be generated and the form should not be submitted.
- The most common form of JavaScript application today is client side script which runs inside a web browser.
- It is used to validate the data entered in the HTML forms on the client side before sending it to the server.
- Using JavaScript, the form is generally checked for the following things :
- Has the user left any required field empty ?
- Has the user entered a valid E-mail address ?
- Check whether contents of two fields are same or not ?
- Has the user entered a valid date ?
- Has the user entered text in the numeric data field ? Say for example; in the quantity field instead of numeric data, user entered text.
- Before starting to learn about how to validate a form, let us first learn how to write a JavaScript code.
- JavaScript code runs from within the HTML webpage. Thus, the JavaScript code can be put directly inside the webpage code as a separate section. The JavaScript code is inserted into an HTML page, using the <script>…</script> tag.
- The lines between the <script> and </ script> tag contains the JavaScript code.
- Remember, JavaScript is a case sensitive language.
- JavaScript can be placed inside the <body> or <head> section of an HTML page. But generally it is preferred that the code be placed in the <head> tag.
- The <script> tag tells the browser to interpret all the text between the <script> tags as a script.
Example 3 :
- Using source view of KompoZer display the statement in the browser “HELLO MY DEAREST STUDENTS”.
- Save the file using File → Save. Give the page title to be displayed in the title bar of the browser screen and press OK. Suppose we give the title JavaScript Example 1. Save the file with proper name.
- Click on source view of KompoZer or select view → HTML source. Here we have to add the coding.
- You can see that inside the <script> tag we have written a single statement document.write (“HELLO MY
- You can see that inside the <script> tag we have written a single statement document.write (“HELLO MY DEAREST STUDENTS”).

Explanation :
- Here write is a method which is a part of the document object.
- The string to be displayed is passed as variable to the method document.write().
- The semicolon seen in figure at the end of the statement is optional in JavaScript.
- The semicolon is used as a mark of separation rather than termination. Thus, if you place each statement on a new line then you need not put a semicolon.
- In our example, even if we remove the semicolon after the document, write statement, the result would be same.
- However, putting a semicolon is a good programming practice.
- The output of the code as seen in the browser is shown in figure.

- Note : JavaScript statements can be grouped together in a block. A block starts and ends with the curly bracket {}.
![]()
Example – 4 :
- Let us now learn how to write a simple JavaScript for form validation.
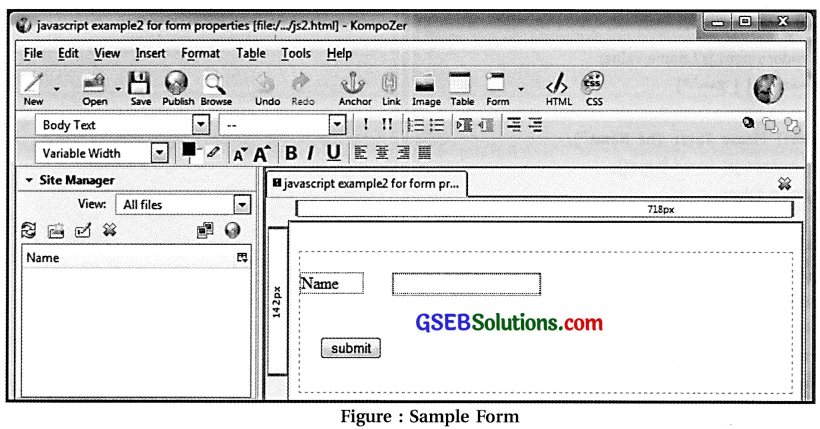
- First, we will create a simple form with two fields : a name field and submit button.
- For form validation, if the user leaves the name field empty and clicks the submit button then a message should be displayed that asks the user to enter the name.
- Follow the steps given to perform the operation :
- Create a new file and save it. Give the necessary title. Save the file with name js2.html.
- Create a new form using Form → Define Form. Give a name to the form.
- In our example, we have named the form as js2. Give js2.html in Action URL and select POST in method.
- As shown in figure insert a label and input text field for the displaying name, also insert a Submit button.
- Note : The names given to the form, input field or any other fields created in the form should be kept simple and easy to remember, as they will be referenced in the script frequently.
- Go to Form → Define Form.
- This will open the Form Properties dialog box as shown in figure.

- Click on Advanced Edit button that will open Advanced Property7 Editor dialog box as shown in figure.

- Select the JavaScript Events tab.
- In the Attribute option select “onsubmit” and in the Value write “return validateFormO” as shown in figure. Press OK button.
- Now, open the source view. Add the script inside the <head> tag as shown in figure.
<html>
<head>
<meta content="text/html; charset=IS0-S859-1"
http-equiv=" content-type" >
<title>javascript example2 far form properties</title>
<script>
function validateForm()
{
var x=document.js2.name.value;
if (x==null | | x=="")
{
alert{"Please Enter The Name");
document.js2.name.focus();
return false;
}
}
</script>
</head>
<body style="height: 142px;">
<form onsubmit="return validateForm()" method="post" action="js2.html" name="js2"><br>
<br>
<label>Name </label>
<input name="name"> <br>
<br>
<br>
<input name="submit" value="submit"
type="submit"> <br>
</form>
</body>
</html>
Figure : JavaScript in source view
As seen in the script tag of figure we have defined :
- a function validateForm()
- a conditional statement if
- an object named document
- Give Ctrl+S.
- Open the file named js2.html in Mozilla Firefox and study the output.
- a variable x
- built-in function alert()
- a method named focus
Question 7.
How does an HTML page identify the JavaScript code? Give an example.
Answer:

Question 8.
Choose the most appropriate option from those given below :
1) Which of the following allows specifying styles for the visual elements of the website?
(A) Cascading Stylesheets
(B) Web page
(C) Form
(D) Animation
Answer:
(A) Cascading Stylesheets
![]()
2) Which of the following is known as special symbol in the syntax of CSS?
(A) Rules
(B) Selector
(C) Declaration
(D) Input
Answer:
(A) Rules
3) Which of the foLlowing are hvo main parts of CSS rule?
(A) Selector, declaration
(B) Select, declaration
(C) Selector, declare
(D) Selection, declaration
Answer:
(A) Selector, declaration
4) Which of the following is an HTML element on which style can be applied?
(A) Declaration
(B) Selector
(C) Select
(D) Declare
Answer:
(B) Selector
5) WhIch of the following ¡s the syntax of CSS?
(A) select {property : value}
(B) selector {value : property}
(C) selector {property : value}
(D) selection {propertv : value}
Answer:
(C) selector {property : value}
6) Which of the following has developed JavaScrip(?
(A) Yahoo
(B) Google
(C) Wikipedia
(D) Netscape
Answer:
(D) Netscape
7) Which of the following is a scripting language that allows adding programming to webpages?
(A) Action script
(B) JavaScript
(C) HTML
(D) CSS
Answer:
(B) JavaScript
![]()
8) WhIch of the following is a scripting language that is simple, lightweight programming language that does not contain advanced progranuning functionalitics?
(A) JavaScript
(B) HTML
(C) C
(D) Java
Answer:
(A) JavaScript
9) Which of the following tag is used to Insert JavaScript code into an hTML page?
(A) <script>… <script>
(B) <script>… </script>
(C) <script>… <//script>
(D) </script>… </script>
Answer:
(B) <script>… </script>
10) Which of the following symbol signifies the start and end of a JavaScript block?
(A) Semicolon
(B) Square bracket
(C) Curly bracket
(D) Round bracket
Answer:
(C) Curly bracket
11) Which of the following is a reusable block of code that performs a particular task?
(A) Array
(B) Code
(C) Program
(D) Function
Answer:
(D) Function
12) Which of the following statement is used to return a value in a function ?
(A) Return
(B) Function
(C) Select
(D) Send
Answer:
(A) Return
13) Which of the following is generated by the browser due to interaction between the user and the webpage?
(A) Function
(B) Response
(C) Event
(D) Value
Answer:
(C) Event
14) Which of the following is not an event?
(A) Abort
(B) Mouseover
(C) Set
(D)) Load
Answer:
(C) Set
![]()
15) Which of the Following is a container for storing data?
(A) Variable
(B) Integer
(C) Event
(D) Event handler
Answer:
(A) Variable
16) Vhich of the following stands for BOM?
(A) Browser Of Model
(B) Browser Object Model
(C) Browser Object Modelling
(D) Browse Object Model
Answer:
(B) Browser Object Model
17) Which of the following la the top level object In the browser object model?
(A) Window
(B) Document
(C) Page
(D) Location
Answer:
(A) Window
18) Which of the following stands for NaN?
(A) Not a Numeric
(B) Not a Number
(C) Not a Noun
(D) Not an Numeric
Answer:
(B) Not a Number
Computer Class 12 GSEB Notes Chapter 2 Cascading Style Sheets and JavaScript
Study of JavaScript Elements
Study of elements taken in Example-4.
Function :
- A function (also called routine) is a reusable block of code that performs a particular task.
- A function is defined by the keyword function and the block of code is written inside the curly braces “{}”
Function validateForm() :
- Here, validateForm() is a function.
- Using this function, when a particular event occurs, the statements or the conditions are executed.
- E.g. when user clicks the submit button, it is an event. It will call the validateForm() function. The statements are executed and here it will return false value.
alert() : JavaScript provides some inbuilt functions such as alert(). The alert() function takes the text and displays it in an alert box.
For example,
function hello()
{
alert(“Hello Students”);
}
- Here the function “hello()” when called, will display an alert box with the message “Hello Students”.
- The function will be executed by an event or when it is called inside a source code.
- A function can be called anywhere from within the source code.
- We can define the function in the head or the body section of the HTML code.
- A function is called by its name. It can also take a value inside the parenthesis.
- This value is passed as a parameter to the function.
- Sometimes you want the function to return a value.
- This is possible by using the return statement.
- The use of return statement, will stop the function from executing and return the specified value.
- In our example, the function validateFormO is called on the click event of the submit button.
- Thus, when the user clicks the submit button, which is known as an event, the function is loaded and the statements inside the function will be executed.
- The function returns a false value.
Events :
- JavaScript is useful in creating interactive webpages which responds to the action performed by the user.
- The interaction between the user and the webpage causes the browser to generate an event.
- In other words, when the user does something an event takes place.
| Event | Description |
| abort | Loading of image is cancelled |
| blur | Element such as a radio button becomes inactive |
| click | User clicks on a form element |
| change | Value of a form filed is changed by the user |
| error | Error occurs during loading of a document or image |
| focus | Element such as button becomes active |
| load | Document or image is loaded |
| mouseout | Mouse moves off the element |
| mouseover | Mouse moves over the element |
| reset | Form fields are reset to default values |
| select | User selects a form field |
| submit | User submits a form |
| unload | User leaves a page |
- When an event occurs, a specific JavaScript code is executed in response to a given situation.
- This JavaScript code is known as event handler.
- Event handler names are kept the same as the name of the event.
- For example, the click event will have an event handler as onclick().
- Likewise, submit event will have an event handler , as onsubmit().
- In our example, we want the validation to be done when the user clicks the submit button i.e. on the “submit” event.
- So, we need to use the onsubmit() event handler.
- Therefore, in figure we had added an event handler onsubmit().
- This event handler will call the function validateForm().
- The function will return a value either True or False depending on whether the name field has a value or null (no value).
![]()
Variable :
- In our example, inside the function validateForm() we have a statement var x=document.jsl.name.value
- We have declared a variable named x.
- A variable is a container for storing data. Remember, that the variables in JavaScript are also case sensitive. So, a variable “x” is not the same as variable “X”.
- The variables can store numbers, strings or text. In JavaScript, we can declare a variable using var keyword.
- For example,
var x=3; .
var y=”Hello”;
var z=”Hello Students”;
If statement :
- You must be familiar with conditional statement if.
- The conditional statement if is used to change the flow of the program.
- The if statement evaluates an expression to validate specific condition.
- If the condition is true, then the program enters in if block and executes the statements inside it.
- In our example, we have used the if statement to check whether the variable x is having null value or not.
- If the variable x is having null value then the statements inside the if block will be executed.
Document Object Model :
(document, js1 .name, value)
- Sometimes, you may want to use JavaScript to control the web browser.
- For example, you may want to change the webpage or control the elements of the webpage.
- To control the web browsers window or the webpage we use the Browser Object Model (BOM).
- All browsers are split into different parts or objects that can be accessed using JavaScript, These parts are known as the Browser Object Model or BOM.
- On the top of this browser hierarchy is the Window object as shown in figure.

- It represents the hierarchy of entire browser along with the toolbar menu, status bar, webpage and many more.
- We can use the properties and the methods of objects in the browser object model to change the window or elements displayed in the browser.
- We do not have to create an object in a browser object model; they are created automatically when the browser opens the webpage.
- The top level object in the browser object model is Window object. Window object represents the browser window or individual frame within the window.
- It is created automatically by the browser.
- The window object is the global object as it contains all the other objects of the browser object model within it.
- For example, window object contains the ‘document object.
- We use the methods and properties of the window object to control the web browser window, while the methods and properties of document object are used to control the webpage.
- The document object is the most important object in the browser object model.
- It is used to represent the webpage displayed in the browser.
- All the elements of the webpage like forms, images, links and others are contained within the document object.
- For example, the form object which is used by JavaScript to represent forms are created using the <form> element within the document object.
- Just as the document object contains a form object, similarly the form object contains element object.
- The element object is used to reference each element in a form. The element objects can be radio, text, checkbox or any other object.
The Focus Method :
- In the script, we have also used a method named focus.
- It is used to apply focus on a particular element of the form.
- Thus, after the user gets an alert message, calling the focus method, the cursor will be placed inside the element and the particular element will be highlighted.
- Here the name element will be focused.
- Let us now open the file in the browser.
- The output as shown in figure will be visible to us.

- Keep the Name field empty and press the Submit button. You will see an alert message as shown in figure appear on the screen.

![]()
- The alert message is the result of the script that we had written in the source view.
- This is the validation that we have provided in the form using JavaScript.
- Thus, a form having more fields can be validated to check if the user has kept any of the fields empty.
- You must have observed while filling forms on Internet, some fields are marked with a red color asterisk mark.
- This is an indication to the user that it is a compulsory field which should not be kept empty.
Using JavaScript, we can check the entry in such fields and provide the alert message to the user.
Example – 5 :
- Let us now add another field in the form named “Pincode”.
- The validations which we will apply on this field are :
- User should not keep the field empty.
- Only numbers are allowed (characters are not allowed).
- The Pincode should be 6 digits long.
- If any of the validation is violated, the user will be displaced an alert message.
- Follow the steps given to create such a validation.
- In Example-4 form name is js2, open it.
- In the same form insert a label and a input field for Pincode.
- In the source view, add the script as shown in figure.
<script>
function validateForm()
{
var x=document.js2.name.value;
var y=document.js2.name.value;
if(x==null || x=="")
{
alert("Please Enter the Name");
document.js2.name.focus ();
return false;
}
If(y=="" || isNaN(y) || y.length>6 || y.length<6)
{
alert("Please Enter the Pincode Properly");
document.js2.name.focus ();
return false;
}
}
</script>
Figure : JavaScript for validating name and pincode
- As seen in the script, we have declared another variable named y.
- The variable y will hold the value of the Pincode field. ’
- In this if condition, we have used a function named isNaNQ.
- Let us understand this function.
Use of is NaN() function in if condition
- To work with numeric values, JavaScript uses built-in functions.
- One of most commonly used numeric function is isNaN().
- NaN stands for “Not a Number”.
- The function isNaN(value) determines whether the value is NaN (Not-a-Number).
- It returns true if the value is not-a-number and false if the value is a number.
- For example, isNaN(123) returns false as the value “123” is a number.
- isNaN(“hello”) returns true as the value “hello” is not a number.
- Thus, using if statement we check if y is; empty, not a number or not equal to six digits.
- If any of the condition is violated then the alert message will be displayed to the user.
- Open the file in the browser.
- The output will be as shown in figure.

- Enter the name in the name field (Do not keep the name field empty, as this will again generate the alert message for it).
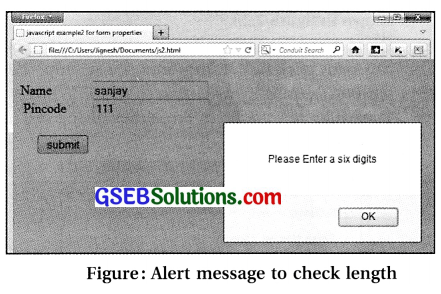
- Keep the Pincode field empty and press the Submit button. This will show an alert message as shown in figure.

- Now, enter some characters or numeric value less than 6 digits length in the Pincode field.
- This will generate the same alert message as shown in figure.
- Here, we have generated the same alert message for all the three validations in the Pincode field.
- If you want that the alert message should be displayed appropriately as per the validation, then we need to modify the script.
- In the example, we used a single if condition for all the three validations and gave the alert message.
- Now, to display the alert message as per the validation, we need to add three if conditions.
- Figure 2.25 shows the script with three if conditions.
<script>
function validateForm()
{
var x=document.js2.name.value;
var y=document.js2.pincode.value;
if (x==null || x=="")
{
alert("Please enter the Name");
document.js2 .name.focus ();
return false;
}
if (y=="")
{
alert("please enter the pincode properly");
document.js2 .pincode.f ocus ();
return false;
}
if (isNaN(y))
{
alert("please enter a number");
document.js2.pincode.focus();s
return false;
}
If (y.length>6 11 y.length<6)
{
alert("please enter a six digits");
document.js2.pincode.focus ();
return false;
}
}
</script>
Figure : JavaScript code to display appropriate message
![]()
- Open the file in the browser. Enter some characters in the Pincode field and press the submit button. This will show an alert message as shown in figure.

- Enter some numeric value less than 6 digits length in the Pincode field and press the submit button. This will show an alert message as shown in figure.
Example – 7 :
- Let us take the “Registration Form’’ that we had created in the Chapter 1 and add JavaScript to it.
- To apply validations, we will make some simple changes in the form that are listed below :
- Gender and Hobby field will not be kept initially selected.
- Address field has no initial text.
- City field has an option “choose the city” whose value is -1.
- All the other options in the city field like Ahmedabad, Rajkot, Surat have values 1, 2, 3 respectively.
- To make the above changes, open the form and select the respective field in the form.

- Go to Form → Form Field. This will show the properties of the respective field and make the changes.
- The form after making the changes will look as shown in figure.
- Go to Form → Define Form. Alternatively, you can right click in the form and select properties option.
- This will open the Form Properties dialog box as shown in figure.

- Click on Advanced Edit button.
- This will open Advanced Property Editor dialog box as shown in figure.
- Select the JavaScript Events tab.
- In the Attribute option select “onsubmit” and under the Value option write “return validate Form().
- Press OK button.

- Add the script shown in figure inside <head> section as of the HTML.
<script>
function validateForm()
{
var x=document.form1.firstname.value;
var y=document.form1.middlename.value;
var z=document.form1.lname.value;
var r=document.form 1 .address.value;
if(x==null || x=="")
{
alert("Please Enter the First name Properly");
document.form1.firstname.focus();
return false;
}
if (y=="" || y==null)
{
alert("Please Enter the Middle name Properly");
document.form1 .middlename.f ocus ();
return false;
}
if(z=="" || z==null)
{
alert("Please Enter the Last name Properly");
document.form1.lname.focusQ;
return false;
}
if(r=="")
{
alert("Please Enter Address");
document.form1.address.f ocus (); return false;
}
if ((document.form1.gender [0].checked==false)&
&(document.form1.gender[1].checked==false))
{
alert("Please choose your Gender: Male or Female");
document.form1.gender.focus ();
return false;
}
if ((document.form1. hobby [0].checked==false)&
&(document.form1. hobby [1].checked==false)&&
(document.form1. hobby [2]. checked==false))
{
alert("Please choose a hobby");
document.form1 .hobby [0] .focus ();
return false;
}
if (document.form1.city. value=="-1")
{
alert("Please provide your city");
document.forml .city.focus () ;
return false;
}
}
</script>
Figure : Validation of JavaScript
![]()
- As seen in the script, we have initialized four variables x, y, z and r.
- In the statement var x=document.forml. firstname. value.
- The term forml refers to the form name; term firstname refers to the element name (the name given to the input field “first name”).
- Thus,
variable x stores the value of first name
variable y stores the value of middle name
variable z stores the value of last name
variable r stores the value of address - In the script, using the if condition, o variable x checks, if the first name is empty or not.
- variable y checks, if the middle name is empty or not.
- variable z checks, if the last name is empty or not.
- variable r checks, if the address is empty or not.
Gender : The radio buttons for gender field are grouped by the name “gender”.
- Thus, gender is an array with two elements.
- The first element of the gender array is checked by using the if condition with the statement document.forml.gender[0].checked and the second element of the array is checked using the statement document.forml. gender [1], checked.
- If both of them are false then no option is selected by the user.
- Thus, alert message is displayed and the focus is placed on radio button.
- Similarly, the checkboxes for the hobby field are grouped by the name “hobby”.
- Thus, hobby is an array with three elements.
- Just as we checked the gender using the if condition, we check the hobby and if all the three elements are false then no option is selected and the user is displayed the alert message to select a hobby and the focus is placed on the checkbox.
- For the city field, we check if the value is equal to -1 (Note: -1 is kept as the value for option “choose the city”), in that case no option is selected and the user is given an alert message.
- Figure to shows some of the alert messages displayed after the fields are left empty. Thus, we learnt how to use JavaScript for form validation and make the webpages more interactive.
- Thus, we learnt how to use JavaScript for form validation and make the webpages more interactive.
